Der Edit-Mode
Editoren bearbeiten Inhalte direkt auf der Live-Seite. Der Edit-Mode verwandelt jede Seite in eine Bearbeitungsfläche — was Sie tun, sehen Sie sofort. Diese Seite erklärt, wie er funktioniert, aus welchen Bausteinen Seiten bestehen und wie Sie sicher arbeiten.
Warum es den Edit-Mode gibt
Klassische Redaktionssysteme trennen „Bearbeiten" und „Ergebnis" — man pflegt Felder in einer Maske und hofft, dass die Seite danach gut aussieht. Der Edit-Mode macht Schluss damit: Sie arbeiten im echten Layout (WYSIWYG). Das senkt Fehler, macht Gestaltung intuitiv und beschleunigt die Redaktion spürbar.
Was der Edit-Mode ist
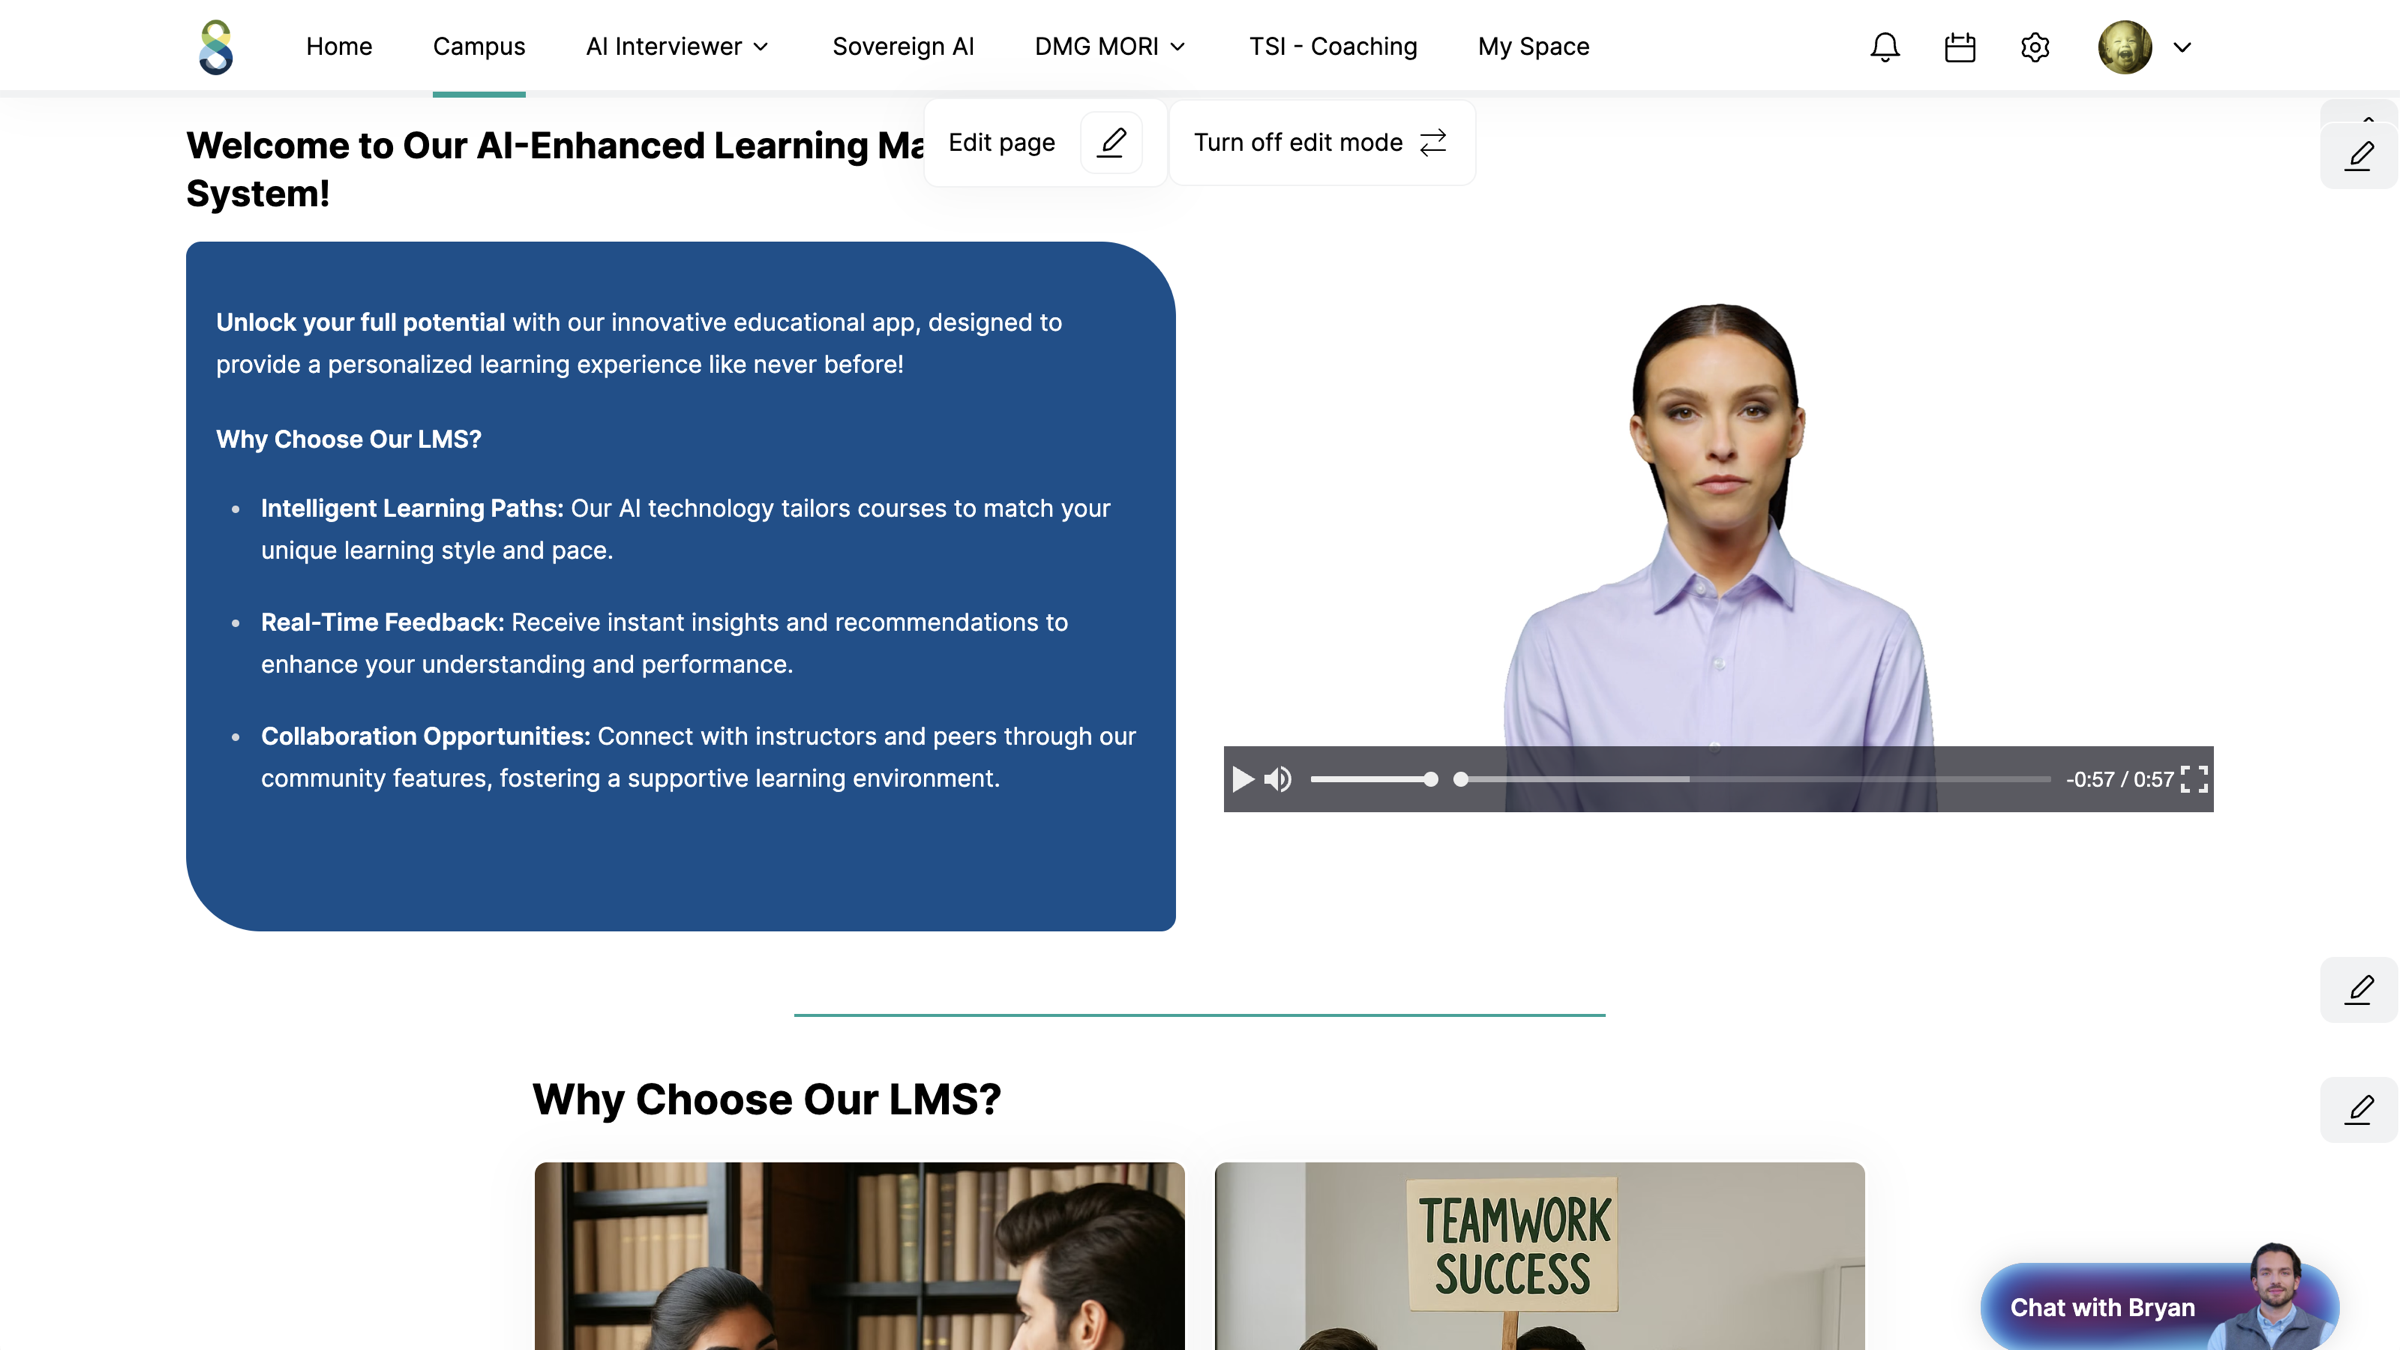
Der Edit-Mode ist ein Schalter, der eine normale Seite in eine bearbeitbare Fläche verwandelt. Aktiv können Sie Inhaltsblöcke hinzufügen, bearbeiten, verschieben und löschen — direkt dort, wo sie erscheinen. Deaktiviert sehen Sie die Seite wieder wie ein normaler Nutzer.
Zwei Wege, ein Inhalt. Neben dem Edit-Mode gibt es das Admin-Backend (Einstellungen → Content → Products) mit strukturierten Formularen. Nutzen Sie den Edit-Mode für Layout & Inhalt, das Backend für Metadaten, Kategorien, Zugriff und Freigabe. Beide bearbeiten dasselbe Product.
Ein- und ausschalten — und wer ihn sieht
Auf Seiten, die Sie bearbeiten dürfen, erscheint der Schalter „Turn on edit mode". Ob Sie ihn sehen, hängt von Ihren Rechten ab: Der Edit-Mode ist ein Admin-Recht (z. B. als Editor), und über Groups ist eingegrenzt, welche Inhalte Sie bearbeiten dürfen.
Die Bausteine: Blöcke & Teaser
Eine Product-Seite wird aus Blöcken (eigener Inhalt) und Teasern (Verweise auf andere Products) zusammengesetzt.
| Block | Wofür |
|---|---|
| Titel | Überschriften und Zwischentitel |
| Text | Formatierbarer Fließtext |
| Bild | Einzelbild aus den Assets |
| Karussell | Mehrere Bilder/Elemente zum Durchblättern |
| Video | Eingebettetes Video |
| Iframe / Einbettung | Externe Inhalte per Einbettung |
| Block / Container | Gruppiert und strukturiert andere Blöcke (Spalten, Abschnitte) |
Teaser (Slider, Grid, Item-Listen) verweisen auf andere Products — so entstehen Startseiten und Hub-Pages. Welche Teaser wem angezeigt werden, steuern Restrictions.
Die Blöcke im Detail
Jeder Blocktyp hat eine eigene Seite mit „Wann verwenden", Optionen und Tipps:
Titel
Überschriften & Zwischentitel.
CmsTextText
Formatierter Fließtext.
CmsImageBild
Einzelbild aus den Assets.
CmsCarouselKarussell
Mehrere Elemente zum Durchblättern.
CmsIframeVideoVideo
Eingebettetes Video.
CmsIframeEinbettung
Externe Inhalte per Iframe.
CmsBlockContainer
Gruppiert & strukturiert Blöcke.
So legen Sie Inhalt an
- Edit-Mode anAuf der Seite Turn on edit mode klicken.
- Einfügestelle wählenAn die Position fahren, an der der Block erscheinen soll — ein + erscheint.
- Blocktyp wählenText, Bild, Video, Karussell … auswählen.
- Inhalt eingebenDirekt tippen bzw. ein Asset auswählen. Änderungen sind sofort sichtbar.
- AnordnenBlock per Ziehen verschieben; nicht Benötigtes löschen.
- Edit-Mode ausZum Prüfen wieder ausschalten — so sehen Sie die Nutzersicht.
Worauf Sie achten sollten
- Struktur vor Deko: Titel-/Text-/Bild-Rhythmus schlägt bunte Block-Vielfalt.
- Konsistenz: gleiche Seitentypen gleich aufbauen — Nutzer finden sich schneller zurecht.
- Sprache: Inhalte in der DEFAULT-Sprache pflegen; QUALITY-Sprache ergänzen.
- Assets zentral: Bilder aus den Assets nutzen statt lokal hochzuladen — einmal pflegen, überall aktuell.
Speichern, Entwurf & Freigabe
Ihre Änderungen werden gespeichert, sind aber erst nach der Freigabe für alle sichtbar. So arbeiten Sie in Ruhe an einem Entwurf, ohne dass Nutzer eine halbfertige Seite sehen. Der Weg vom Entwurf zur Veröffentlichung ist ein eigener Ablauf — siehe Freigeben & veröffentlichen.
Große Umbauten? Prüfen Sie zwischendurch mit ausgeschaltetem Edit-Mode und — bei kritischen Seiten — mit einem Testkonto der Zielgruppe.
Troubleshooting
Ich sehe den Schalter „Turn on edit mode" nicht.
Dann fehlt Ihnen das Bearbeitungsrecht für diese Seite. Ein Admin fügt Sie der passenden Group hinzu bzw. schaltet die Content-Rechte frei.
Meine Änderung ist für Nutzer nicht sichtbar.
Wahrscheinlich noch nicht freigegeben — oder eine Restriction blendet den Inhalt für die Zielgruppe aus.
Ein Block lässt sich nicht verschieben/löschen.
Manche Blöcke stecken in einem Container. Wählen Sie zuerst den Container, dann den inneren Block — oder bearbeiten Sie die Struktur im Backend.
Verwandtes
- Ein Product anlegen · Die Product-Typen
- Medien & Assets · Freigeben & veröffentlichen
- How to: perfekte Inhalte
Weiter: Ein Product anlegen.
Edit mode
Editors edit content directly on the live page. Edit mode turns every page into an editing surface — what you do, you see instantly. This page explains how it works, which building blocks make up pages and how to work safely.
Why edit mode exists
Classic editorial systems separate “editing” and “result” — you fill in fields in a form and hope the page looks good afterwards. Edit mode puts an end to that: you work in the real layout (WYSIWYG). This reduces errors, makes design intuitive and noticeably speeds up editorial work.
What edit mode is
Edit mode is a switch that turns a normal page into an editable surface. When active you can add, edit, move and delete content blocks — right where they appear. When deactivated you see the page again as a normal user would.
Two ways, one content. Alongside edit mode there is the admin backend (Settings → Content → Products) with structured forms. Use edit mode for layout & content, the backend for metadata, categories, access and approval. Both edit the same product.
Switching on and off — and who sees it
On pages you are allowed to edit, the switch “Turn on edit mode” appears. Whether you see it depends on your rights: edit mode is an admin right (e.g. as an editor), and groups narrow down which content you may edit.
The building blocks: blocks & teasers
A product page is assembled from blocks (own content) and teasers (references to other products).
| Block | What for |
|---|---|
| Title | Headings and subheadings |
| Text | Formattable body text |
| Image | Single image from the assets |
| Carousel | Several images/elements to page through |
| Video | Embedded video |
| Iframe / embed | External content via embed |
| Block / container | Groups and structures other blocks (columns, sections) |
Teasers (sliders, grids, item lists) reference other products — this is how landing pages and hub pages are created. Which teasers are shown to whom is controlled by restrictions.
The blocks in detail
Each block type has its own page with “when to use”, options and tips:
Title
Headings & subheadings.
CmsTextText
Formatted body text.
CmsImageImage
Single image from the assets.
CmsCarouselCarousel
Several elements to page through.
CmsIframeVideoVideo
Embedded video.
CmsIframeEmbed
External content via iframe.
CmsBlockContainer
Groups & structures blocks.
How to create content
- Turn on edit modeClick Turn on edit mode on the page.
- Choose the insertion pointMove to the position where the block should appear — a + appears.
- Choose the block typeSelect text, image, video, carousel …
- Enter contentType directly or select an asset. Changes are visible immediately.
- ArrangeMove the block by dragging; delete what is not needed.
- Turn off edit modeSwitch off again to check — this shows the user’s view.
What to watch
- Structure before decoration: a title/text/image rhythm beats a colourful variety of blocks.
- Consistency: build the same page types the same way — users find their way faster.
- Language: maintain content in the DEFAULT language; add the QUALITY language.
- Assets centrally: use images from the assets instead of uploading locally — maintain once, up to date everywhere.
Saving, draft & approval
Your changes are saved but only visible to everyone after approval. This way you can work on a draft in peace without users seeing a half-finished page. The path from draft to publication is its own process — see Approve & publish.
Major rebuilds? Check in between with edit mode switched off and — for critical pages — with a test account of the target group.
Troubleshooting
I don’t see the “Turn on edit mode” switch.
Then you lack the editing right for this page. An admin adds you to the appropriate group or enables the content rights.
My change is not visible to users.
Probably not yet approved — or a restriction hides the content from the target group.
A block cannot be moved/deleted.
Some blocks sit inside a container. Select the container first, then the inner block — or edit the structure in the backend.
Related
Next: Create a product.
Le mode Edit
Les éditeurs modifient les contenus directement sur la page en ligne. Le mode Edit transforme chaque page en une surface d'édition — ce que vous faites, vous le voyez immédiatement. Cette page explique son fonctionnement, de quels blocs les pages sont composées et comment travailler en toute sécurité.
Pourquoi le mode Edit existe
Les systèmes rédactionnels classiques séparent « l'édition » du « résultat » — on remplit des champs dans un masque et on espère que la page sera belle ensuite. Le mode Edit met fin à cela : vous travaillez dans la mise en page réelle (WYSIWYG). Cela réduit les erreurs, rend la conception intuitive et accélère sensiblement la rédaction.
Ce qu'est le mode Edit
Le mode Edit est un interrupteur qui transforme une page normale en une surface modifiable. Une fois activé, vous pouvez ajouter, modifier, déplacer et supprimer des blocs de contenu — directement là où ils apparaissent. Désactivé, vous voyez à nouveau la page comme un utilisateur normal.
Deux voies, un même contenu. Outre le mode Edit, il existe le back-end d'administration (Paramètres → Content → Products) avec des formulaires structurés. Utilisez le mode Edit pour la mise en page et le contenu, le back-end pour les métadonnées, les catégories, les accès et la publication. Les deux modifient le même Product.
Activer et désactiver — et qui le voit
Sur les pages que vous êtes autorisé à modifier, l'interrupteur « Turn on edit mode » apparaît. Le fait que vous le voyiez dépend de vos droits : le mode Edit est un droit Admin (par ex. en tant qu'éditeur), et les Groups déterminent quels contenus vous êtes autorisé à modifier.
Les blocs : Blöcke et Teaser
Une page Product est composée de blocs (contenu propre) et de Teasern (renvois vers d'autres Products).
| Bloc | À quoi il sert |
|---|---|
| Titre | Titres et intertitres |
| Texte | Texte courant formatable |
| Image | Image unique issue des Assets |
| Carrousel | Plusieurs images/éléments à faire défiler |
| Vidéo | Vidéo intégrée |
| Iframe / Intégration | Contenus externes par intégration |
| Bloc / Conteneur | Regroupe et structure d'autres blocs (colonnes, sections) |
Les Teaser (slider, grille, listes d'éléments) renvoient vers d'autres Products — c'est ainsi que naissent les pages d'accueil et les Hub-Pages. Les Restrictions déterminent quels Teaser sont affichés à qui.
Les blocs en détail
Chaque type de bloc a sa propre page avec « Quand l'utiliser », options et conseils :
Titre
Titres et intertitres.
CmsTextTexte
Texte courant formaté.
CmsImageImage
Image unique issue des Assets.
CmsCarouselCarrousel
Plusieurs éléments à faire défiler.
CmsIframeVideoVidéo
Vidéo intégrée.
CmsIframeIntégration
Contenus externes par iframe.
CmsBlockConteneur
Regroupe et structure les blocs.
Comment créer du contenu
- Activer le mode EditSur la page, cliquer sur Turn on edit mode.
- Choisir l'emplacement d'insertionSe placer à la position où le bloc doit apparaître — un + apparaît.
- Choisir le type de blocSélectionner Texte, Image, Vidéo, Carrousel…
- Saisir le contenuTaper directement ou sélectionner un Asset. Les modifications sont immédiatement visibles.
- OrganiserDéplacer le bloc par glissement ; supprimer ce dont vous n'avez pas besoin.
- Désactiver le mode EditLe désactiver pour vérifier — vous voyez ainsi la vue utilisateur.
Ce à quoi vous devez veiller
- La structure avant la déco : un rythme titre/texte/image l'emporte sur une multitude de blocs colorés.
- Cohérence : construire de la même manière les mêmes types de pages — les utilisateurs s'y retrouvent plus vite.
- Langue : soigner les contenus dans la langue DEFAULT ; compléter avec la langue QUALITY.
- Assets centralisés : utiliser les images des Assets plutôt que de les téléverser localement — soigner une fois, à jour partout.
Enregistrer, brouillon et publication
Vos modifications sont enregistrées, mais elles ne sont visibles par tous qu'après la publication. Vous travaillez ainsi tranquillement sur un brouillon sans que les utilisateurs voient une page à moitié terminée. Le passage du brouillon à la publication est un processus à part entière — voir Valider et publier.
De grosses refontes ? Vérifiez de temps en temps avec le mode Edit désactivé et — pour les pages critiques — avec un compte de test du groupe cible.
Dépannage
Je ne vois pas l'interrupteur « Turn on edit mode ».
Alors il vous manque le droit d'édition pour cette page. Un admin vous ajoute au bon Group ou active les droits de contenu.
Ma modification n'est pas visible pour les utilisateurs.
Elle n'a probablement pas encore été publiée — ou une Restriction masque le contenu pour le groupe cible.
Un bloc ne peut pas être déplacé/supprimé.
Certains blocs sont imbriqués dans un conteneur. Sélectionnez d'abord le conteneur, puis le bloc intérieur — ou modifiez la structure dans le back-end.
Sur le même sujet
- Créer un Product · Les types de Product
- Médias et Assets · Valider et publier
- How to : des contenus parfaits
Suite : Créer un Product.
Edit-Mode
Edytorzy edytują treści bezpośrednio na stronie na żywo. Edit-Mode zamienia każdą stronę w powierzchnię do edycji — to, co robisz, widzisz od razu. Ta strona wyjaśnia, jak działa, z jakich elementów składają się strony i jak pracować bezpiecznie.
Dlaczego istnieje Edit-Mode
Klasyczne systemy redakcyjne oddzielają „edycję" od „efektu" — pola uzupełnia się w formularzu i ma się nadzieję, że strona będzie potem dobrze wyglądać. Edit-Mode kończy z tym: pracujesz w rzeczywistym układzie (WYSIWYG). To ogranicza błędy, czyni projektowanie intuicyjnym i zauważalnie przyspiesza pracę redakcyjną.
Czym jest Edit-Mode
Edit-Mode to przełącznik, który zamienia zwykłą stronę w edytowalną powierzchnię. Gdy jest aktywny, możesz dodawać, edytować, przesuwać i usuwać bloki treści — dokładnie tam, gdzie się pojawiają. Po wyłączeniu widzisz stronę ponownie jak zwykły użytkownik.
Dwie drogi, jedna treść. Obok Edit-Mode istnieje Admin-Backend (Ustawienia → Content → Products) ze strukturyzowanymi formularzami. Używaj Edit-Mode do układu i treści, a backendu do metadanych, kategorii, dostępu i zatwierdzania. Oba edytują ten sam Product.
Włączanie i wyłączanie — oraz kto go widzi
Na stronach, które możesz edytować, pojawia się przełącznik „Turn on edit mode". To, czy go widzisz, zależy od Twoich uprawnień: Edit-Mode jest uprawnieniem Admin (np. jako Editor), a poprzez Groups ograniczone jest to, które treści możesz edytować.
Elementy składowe: bloki i Teasery
Strona Product składa się z bloków (własna treść) i Teaserów (odesłania do innych Products).
| Blok | Do czego |
|---|---|
| Tytuł | Nagłówki i śródtytuły |
| Tekst | Formatowalny tekst ciągły |
| Obraz | Pojedynczy obraz z zasobów |
| Karuzela | Wiele obrazów/elementów do przewijania |
| Wideo | Osadzone wideo |
| Iframe / osadzenie | Treści zewnętrzne poprzez osadzenie |
| Blok / kontener | Grupuje i strukturyzuje inne bloki (kolumny, sekcje) |
Teasery (slider, siatka, listy elementów) odsyłają do innych Products — tak powstają strony startowe i Hub Pages. To, które Teasery są komu wyświetlane, sterują Restrictions.
Bloki szczegółowo
Każdy typ bloku ma własną stronę z opisem „Kiedy używać", opcjami i wskazówkami:
Tytuł
Nagłówki i śródtytuły.
CmsTextTekst
Formatowany tekst ciągły.
CmsImageObraz
Pojedynczy obraz z zasobów.
CmsCarouselKaruzela
Wiele elementów do przewijania.
CmsIframeVideoWideo
Osadzone wideo.
CmsIframeOsadzenie
Treści zewnętrzne poprzez Iframe.
CmsBlockKontener
Grupuje i strukturyzuje bloki.
Jak tworzysz treść
- Włącz Edit-ModeNa stronie kliknij Turn on edit mode.
- Wybierz miejsce wstawieniaNajedź na pozycję, w której ma pojawić się blok — pojawi się +.
- Wybierz typ blokuTekst, obraz, wideo, karuzela … do wyboru.
- Wprowadź treśćWpisuj bezpośrednio lub wybierz zasób. Zmiany są od razu widoczne.
- UporządkujPrzesuwaj blok przeciąganiem; usuwaj to, co niepotrzebne.
- Wyłącz Edit-ModeAby sprawdzić, wyłącz go ponownie — tak widzisz widok użytkownika.
Na co zwrócić uwagę
- Struktura przed dekoracją: rytm tytuł/tekst/obraz przewyższa barwną różnorodność bloków.
- Spójność: te same typy stron buduj tak samo — użytkownicy szybciej się odnajdą.
- Język: treści prowadź w języku DEFAULT; język QUALITY uzupełnij.
- Zasoby centralnie: używaj obrazów z zasobów zamiast wgrywać lokalnie — raz zaktualizujesz, wszędzie aktualne.
Zapis, wersja robocza i zatwierdzanie
Twoje zmiany są zapisywane, ale stają się widoczne dla wszystkich dopiero po zatwierdzeniu. Dzięki temu spokojnie pracujesz nad wersją roboczą, a użytkownicy nie widzą niedokończonej strony. Droga od wersji roboczej do publikacji to osobny proces — zobacz Zatwierdzanie i publikowanie.
Duże przebudowy? Sprawdzaj co jakiś czas z wyłączonym Edit-Mode oraz — przy krytycznych stronach — z kontem testowym grupy docelowej.
Rozwiązywanie problemów
Nie widzę przełącznika „Turn on edit mode".
W takim razie brakuje Ci uprawnienia do edycji tej strony. Admin doda Cię do odpowiedniej Group lub odblokuje uprawnienia do treści.
Moja zmiana nie jest widoczna dla użytkowników.
Prawdopodobnie jeszcze nie zatwierdzona — albo Restriction ukrywa treść przed grupą docelową.
Nie da się przesunąć/usunąć bloku.
Niektóre bloki tkwią w kontenerze. Zaznacz najpierw kontener, potem wewnętrzny blok — albo edytuj strukturę w backendzie.
Powiązane
- Utworzenie Product · Typy Product
- Media i zasoby · Zatwierdzanie i publikowanie
- How to: idealne treści
Dalej: Utworzenie Product.
L'Edit-Mode
Gli editori modificano i contenuti direttamente sulla pagina live. L'Edit-Mode trasforma ogni pagina in una superficie di modifica: ciò che fate lo vedete subito. Questa pagina spiega come funziona, da quali elementi sono composte le pagine e come lavorare in sicurezza.
Perché esiste l'Edit-Mode
I sistemi redazionali classici separano „modifica" e „risultato": si compilano campi in una maschera sperando che la pagina risulti poi ben fatta. L'Edit-Mode elimina questo problema: lavorate nel layout reale (WYSIWYG). Ciò riduce gli errori, rende la progettazione intuitiva e accelera sensibilmente il lavoro redazionale.
Che cos'è l'Edit-Mode
L'Edit-Mode è un interruttore che trasforma una pagina normale in una superficie modificabile. Quando è attivo potete aggiungere, modificare, spostare ed eliminare blocchi di contenuto, proprio nel punto in cui compaiono. Quando è disattivato vedete di nuovo la pagina come un normale utente.
Due vie, un contenuto. Oltre all'Edit-Mode esiste il backend di amministrazione (Impostazioni → Content → Products) con moduli strutturati. Usate l'Edit-Mode per layout e contenuto, il backend per metadati, categorie, accesso e pubblicazione. Entrambi modificano lo stesso Product.
Attivare e disattivare — e chi lo vede
Sulle pagine che potete modificare compare l'interruttore „Turn on edit mode". Se lo vedete dipende dai vostri diritti: l'Edit-Mode è un diritto admin (ad esempio come editore) e tramite i Groups è delimitato quali contenuti potete modificare.
Gli elementi costitutivi: blocchi e Teaser
Una pagina Product è composta da blocchi (contenuto proprio) e Teaser (rimandi ad altri Products).
| Blocco | A cosa serve |
|---|---|
| Titolo | Titoli e sottotitoli |
| Testo | Testo scorrevole formattabile |
| Immagine | Singola immagine dagli Assets |
| Carosello | Più immagini/elementi da sfogliare |
| Video | Video incorporato |
| Iframe / Incorporamento | Contenuti esterni tramite incorporamento |
| Blocco / Container | Raggruppa e struttura altri blocchi (colonne, sezioni) |
I Teaser (slider, griglia, elenchi di elementi) rimandano ad altri Products: così nascono le pagine iniziali e le Hub Pages. Quali Teaser vengono mostrati a chi è gestito dalle Restrictions.
I blocchi nel dettaglio
Ogni tipo di blocco ha una pagina propria con „Quando usarlo", opzioni e consigli:
Titolo
Titoli e sottotitoli.
CmsTextTesto
Testo scorrevole formattato.
CmsImageImmagine
Singola immagine dagli Assets.
CmsCarouselCarosello
Più elementi da sfogliare.
CmsIframeVideoVideo
Video incorporato.
CmsIframeIncorporamento
Contenuti esterni tramite Iframe.
CmsBlockContainer
Raggruppa e struttura i blocchi.
Come creare un contenuto
- Attivare l'Edit-ModeSulla pagina, cliccare Turn on edit mode.
- Scegliere il punto di inserimentoPortarsi nella posizione in cui il blocco deve comparire: appare un +.
- Scegliere il tipo di bloccoSelezionare Testo, Immagine, Video, Carosello …
- Inserire il contenutoDigitare direttamente o selezionare un asset. Le modifiche sono subito visibili.
- DisporreSpostare il blocco trascinandolo; eliminare ciò che non serve.
- Disattivare l'Edit-ModePer verificare, disattivarlo di nuovo: così vedete la vista utente.
A cosa fare attenzione
- Struttura prima della decorazione: il ritmo titolo/testo/immagine batte la varietà colorata di blocchi.
- Coerenza: costruite allo stesso modo le pagine dello stesso tipo — gli utenti si orientano più in fretta.
- Lingua: curate i contenuti nella lingua DEFAULT; integrate la lingua QUALITY.
- Assets centralizzati: usate le immagini dagli Assets anziché caricarle localmente — si curano una volta e restano aggiornate ovunque.
Salvataggio, bozza e pubblicazione
Le vostre modifiche vengono salvate, ma diventano visibili a tutti solo dopo la pubblicazione. Così lavorate con calma a una bozza senza che gli utenti vedano una pagina incompleta. Il percorso dalla bozza alla pubblicazione è un flusso a sé — si veda Approvare e pubblicare.
Grandi ristrutturazioni? Verificate di tanto in tanto con l'Edit-Mode disattivato e — per le pagine critiche — con un account di prova del gruppo target.
Troubleshooting
Non vedo l'interruttore „Turn on edit mode".
In tal caso vi manca il diritto di modifica per questa pagina. Un admin vi aggiunge al Group adatto oppure abilita i diritti sui contenuti.
La mia modifica non è visibile agli utenti.
Probabilmente non è ancora stata pubblicata — oppure una Restriction nasconde il contenuto al gruppo target.
Un blocco non si lascia spostare/eliminare.
Alcuni blocchi si trovano dentro un Container. Selezionate prima il Container, poi il blocco interno — oppure modificate la struttura nel backend.
Correlati
- Creare un Product · I tipi di Product
- Media e Assets · Approvare e pubblicare
- How to: contenuti perfetti
Avanti: Creare un Product.
De Edit-Mode
Editors bewerken content rechtstreeks op de live-pagina. De Edit-Mode maakt van elke pagina een bewerkingsvlak — wat u doet, ziet u meteen. Deze pagina legt uit hoe hij werkt, uit welke bouwstenen pagina's bestaan en hoe u veilig werkt.
Waarom de Edit-Mode bestaat
Klassieke redactiesystemen scheiden „bewerken" en „resultaat" — u onderhoudt velden in een formulier en hoopt dat de pagina er daarna goed uitziet. De Edit-Mode maakt daar een einde aan: u werkt in de echte lay-out (WYSIWYG). Dat vermindert fouten, maakt vormgeving intuïtief en versnelt de redactie merkbaar.
Wat de Edit-Mode is
De Edit-Mode is een schakelaar die een gewone pagina in een bewerkbaar vlak verandert. Actief kunt u contentblokken toevoegen, bewerken, verplaatsen en verwijderen — precies daar waar ze verschijnen. Uitgeschakeld ziet u de pagina weer zoals een gewone gebruiker.
Twee wegen, één inhoud. Naast de Edit-Mode is er het Admin-backend (Instellingen → Content → Products) met gestructureerde formulieren. Gebruik de Edit-Mode voor lay-out & content, het backend voor metadata, categorieën, toegang en vrijgave. Beide bewerken hetzelfde Product.
In- en uitschakelen — en wie hem ziet
Op pagina's die u mag bewerken, verschijnt de schakelaar „Turn on edit mode". Of u hem ziet, hangt af van uw rechten: de Edit-Mode is een Admin-recht (bijv. als Editor), en via Groups is afgebakend welke content u mag bewerken.
De bouwstenen: blokken & Teasers
Een Product-pagina wordt samengesteld uit blokken (eigen inhoud) en Teasers (verwijzingen naar andere Products).
| Blok | Waarvoor |
|---|---|
| Titel | Koppen en tussentitels |
| Tekst | Opmaakbare lopende tekst |
| Afbeelding | Enkele afbeelding uit de assets |
| Carrousel | Meerdere afbeeldingen/elementen om doorheen te bladeren |
| Video | Ingesloten video |
| Iframe / Insluiting | Externe content via insluiting |
| Blok / Container | Groepeert en structureert andere blokken (kolommen, secties) |
Teasers (slider, grid, itemlijsten) verwijzen naar andere Products — zo ontstaan startpagina's en Hub-Pages. Welke Teasers aan wie worden getoond, sturen Restrictions.
De blokken in detail
Elk bloktype heeft een eigen pagina met „Wanneer gebruiken", opties en tips:
Titel
Koppen & tussentitels.
CmsTextTekst
Opgemaakte lopende tekst.
CmsImageAfbeelding
Enkele afbeelding uit de assets.
CmsCarouselCarrousel
Meerdere elementen om doorheen te bladeren.
CmsIframeVideoVideo
Ingesloten video.
CmsIframeInsluiting
Externe content via iframe.
CmsBlockContainer
Groepeert & structureert blokken.
Zo maakt u content aan
- Edit-Mode aanKlik op de pagina op Turn on edit mode.
- Invoegplek kiezenGa naar de positie waar het blok moet verschijnen — een + verschijnt.
- Bloktype kiezenKies Tekst, Afbeelding, Video, Carrousel …
- Content invoerenTyp direct of selecteer een asset. Wijzigingen zijn meteen zichtbaar.
- OrdenenVerplaats het blok door te slepen; verwijder wat u niet nodig hebt.
- Edit-Mode uitSchakel weer uit om te controleren — zo ziet u de gebruikersweergave.
Waar u op moet letten
- Structuur vóór decoratie: een ritme van titel/tekst/afbeelding wint van bonte blokvariatie.
- Consistentie: bouw dezelfde paginatypes gelijk op — gebruikers vinden sneller hun weg.
- Taal: onderhoud content in de DEFAULT-taal; vul QUALITY-taal aan.
- Assets centraal: gebruik afbeeldingen uit de assets in plaats van lokaal te uploaden — één keer onderhouden, overal actueel.
Opslaan, concept & vrijgave
Uw wijzigingen worden opgeslagen, maar zijn pas na de vrijgave voor iedereen zichtbaar. Zo werkt u rustig aan een concept zonder dat gebruikers een halfafgewerkte pagina zien. De weg van concept naar publicatie is een eigen proces — zie Vrijgeven & publiceren.
Grote verbouwingen? Controleer tussendoor met uitgeschakelde Edit-Mode en — bij kritische pagina's — met een testaccount van de doelgroep.
Troubleshooting
Ik zie de schakelaar „Turn on edit mode" niet.
Dan mist u het bewerkingsrecht voor deze pagina. Een Admin voegt u toe aan de juiste Group of schakelt de content-rechten vrij.
Mijn wijziging is voor gebruikers niet zichtbaar.
Waarschijnlijk nog niet vrijgegeven — of een Restriction verbergt de content voor de doelgroep.
Een blok laat zich niet verplaatsen/verwijderen.
Sommige blokken zitten in een Container. Selecteer eerst de Container en dan het binnenste blok — of bewerk de structuur in het backend.
Verwant
- Een Product aanmaken · De Product-typen
- Media & assets · Vrijgeven & publiceren
- How to: perfecte content
Verder: Een Product aanmaken.
Edit-Mode
Editorii editează conținutul direct pe pagina live. Edit-Mode transformă fiecare pagină într-o suprafață de editare — ceea ce faceți vedeți imediat. Această pagină explică modul în care funcționează, din ce blocuri sunt alcătuite paginile și cum lucrați în siguranță.
De ce există Edit-Mode
Sistemele de redacție clasice separă „editarea" de „rezultat" — completați câmpuri într-o mască și sperați că pagina va arăta bine după aceea. Edit-Mode pune capăt acestui lucru: lucrați în layoutul real (WYSIWYG). Acest lucru reduce erorile, face designul intuitiv și accelerează vizibil munca de redacție.
Ce este Edit-Mode
Edit-Mode este un comutator care transformă o pagină normală într-o suprafață editabilă. Activat, puteți adăuga, edita, muta și șterge blocuri de conținut — direct acolo unde apar. Dezactivat, vedeți pagina din nou ca un utilizator obișnuit.
Două căi, un singur conținut. Pe lângă Edit-Mode există backendul de administrare (Setări → Content → Products) cu formulare structurate. Folosiți Edit-Mode pentru layout & conținut, iar backendul pentru metadate, categorii, acces și publicare. Ambele editează același Product.
Pornirea și oprirea — și cine îl vede
Pe paginile pe care aveți dreptul să le editați apare comutatorul „Turn on edit mode". Dacă îl vedeți depinde de drepturile dumneavoastră: Edit-Mode este un drept de Admin (de ex. ca Editor), iar prin Groups se delimitează care conținuturi aveți dreptul să le editați.
Blocurile: Blocuri & Teaser
O pagină Product este alcătuită din blocuri (conținut propriu) și Teaser (trimiteri către alte Products).
| Bloc | Pentru ce |
|---|---|
| Titlu | Titluri și subtitluri |
| Text | Text curent formatabil |
| Imagine | Imagine unică din Assets |
| Carusel | Mai multe imagini/elemente de răsfoit |
| Video | Video încorporat |
| Iframe / Încorporare | Conținut extern prin încorporare |
| Bloc / Container | Grupează și structurează alte blocuri (coloane, secțiuni) |
Teaser (slider, grid, liste de elemente) trimit către alte Products — astfel iau naștere paginile de start și Hub-Pages. Care Teaser sunt afișate cui este controlat de Restrictions.
Blocurile în detaliu
Fiecare tip de bloc are o pagină proprie cu „Când se folosește", opțiuni și sfaturi:
Titlu
Titluri & subtitluri.
CmsTextText
Text curent formatat.
CmsImageImagine
Imagine unică din Assets.
CmsCarouselCarusel
Mai multe elemente de răsfoit.
CmsIframeVideoVideo
Video încorporat.
CmsIframeÎncorporare
Conținut extern prin Iframe.
CmsBlockContainer
Grupează & structurează blocuri.
Cum creați conținut
- Activați Edit-ModePe pagină faceți clic pe Turn on edit mode.
- Alegeți locul de inserareDeplasați-vă la poziția unde trebuie să apară blocul — apare un +.
- Alegeți tipul de blocSelectați Text, Imagine, Video, Carusel …
- Introduceți conținutulTastați direct sau selectați un Asset. Modificările sunt vizibile imediat.
- AranjațiMutați blocul prin tragere; ștergeți ce nu este necesar.
- Opriți Edit-ModeOpriți-l din nou pentru verificare — astfel vedeți vizualizarea utilizatorului.
La ce trebuie să fiți atenți
- Structura înaintea decorului: ritmul titlu/text/imagine bate diversitatea colorată de blocuri.
- Consecvență: construiți la fel același tip de pagini — utilizatorii se orientează mai repede.
- Limba: întrețineți conținutul în limba DEFAULT; completați limba QUALITY.
- Assets central: folosiți imaginile din Assets în loc să le încărcați local — întrețineți o singură dată, actual peste tot.
Salvare, ciornă & publicare
Modificările dumneavoastră sunt salvate, dar devin vizibile pentru toți abia după publicare. Astfel lucrați în liniște la o ciornă, fără ca utilizatorii să vadă o pagină pe jumătate terminată. Drumul de la ciornă la publicare este un flux propriu — vezi Aprobare & publicare.
Reamenajări mari? Verificați între timp cu Edit-Mode oprit și — la paginile critice — cu un cont de test al grupului-țintă.
Troubleshooting
Nu văd comutatorul „Turn on edit mode".
Atunci vă lipsește dreptul de editare pentru această pagină. Un administrator vă adaugă în Group potrivită sau vă deblochează drepturile de conținut.
Modificarea mea nu este vizibilă pentru utilizatori.
Probabil încă nu este publicată — sau o Restriction ascunde conținutul pentru grupul-țintă.
Un bloc nu poate fi mutat/șters.
Unele blocuri se află într-un Container. Selectați mai întâi containerul, apoi blocul interior — sau editați structura în backend.
Înrudite
- Crearea unui Product · Tipurile de Product
- Media & Assets · Aprobare & publicare
- How to: conținut perfect
Mai departe: Crearea unui Product.
Η λειτουργία Edit-Mode
Οι συντάκτες επεξεργάζονται το περιεχόμενο απευθείας στη ζωντανή σελίδα. Η λειτουργία Edit-Mode μετατρέπει κάθε σελίδα σε επιφάνεια επεξεργασίας — ό,τι κάνετε, το βλέπετε αμέσως. Αυτή η σελίδα εξηγεί πώς λειτουργεί, από ποια δομικά στοιχεία αποτελούνται οι σελίδες και πώς εργάζεστε με ασφάλεια.
Γιατί υπάρχει η λειτουργία Edit-Mode
Τα κλασικά συστήματα διαχείρισης περιεχομένου διαχωρίζουν την «επεξεργασία» από το «αποτέλεσμα» — συμπληρώνετε πεδία σε μια φόρμα και ελπίζετε ότι η σελίδα θα φαίνεται καλή μετά. Η λειτουργία Edit-Mode βάζει τέλος σε αυτό: εργάζεστε στην πραγματική διάταξη (WYSIWYG). Αυτό μειώνει τα σφάλματα, κάνει τη διαμόρφωση διαισθητική και επιταχύνει αισθητά τη σύνταξη.
Τι είναι η λειτουργία Edit-Mode
Η λειτουργία Edit-Mode είναι ένας διακόπτης που μετατρέπει μια κανονική σελίδα σε επεξεργάσιμη επιφάνεια. Όταν είναι ενεργή, μπορείτε να προσθέτετε, να επεξεργάζεστε, να μετακινείτε και να διαγράφετε μπλοκ περιεχομένου — απευθείας εκεί όπου εμφανίζονται. Όταν είναι απενεργοποιημένη, βλέπετε τη σελίδα ξανά όπως ένας κανονικός χρήστης.
Δύο δρόμοι, ένα περιεχόμενο. Πέρα από τη λειτουργία Edit-Mode υπάρχει το Admin-Backend (Ρυθμίσεις → Content → Products) με δομημένες φόρμες. Χρησιμοποιήστε τη λειτουργία Edit-Mode για διάταξη & περιεχόμενο, το backend για μεταδεδομένα, κατηγορίες, πρόσβαση και έγκριση. Και τα δύο επεξεργάζονται το ίδιο Product.
Ενεργοποίηση και απενεργοποίηση — και ποιος τη βλέπει
Σε σελίδες που επιτρέπεται να επεξεργαστείτε, εμφανίζεται ο διακόπτης «Turn on edit mode». Το αν τον βλέπετε εξαρτάται από τα δικαιώματά σας: η λειτουργία Edit-Mode είναι δικαίωμα Admin (π.χ. ως Συντάκτης), και μέσω των Groups περιορίζεται ποιο περιεχόμενο επιτρέπεται να επεξεργαστείτε.
Τα δομικά στοιχεία: Μπλοκ & Teaser
Μια σελίδα Product συντίθεται από μπλοκ (δικό της περιεχόμενο) και teaser (παραπομπές σε άλλα Products).
| Μπλοκ | Για τι |
|---|---|
| Τίτλος | Επικεφαλίδες και υπότιτλοι |
| Κείμενο | Μορφοποιήσιμο συνεχές κείμενο |
| Εικόνα | Μεμονωμένη εικόνα από τα Assets |
| Καρουζέλ | Πολλές εικόνες/στοιχεία για ξεφύλλισμα |
| Βίντεο | Ενσωματωμένο βίντεο |
| Iframe / Ενσωμάτωση | Εξωτερικό περιεχόμενο μέσω ενσωμάτωσης |
| Μπλοκ / Container | Ομαδοποιεί και δομεί άλλα μπλοκ (στήλες, ενότητες) |
Τα Teaser (Slider, Grid, λίστες στοιχείων) παραπέμπουν σε άλλα Products — έτσι δημιουργούνται αρχικές σελίδες και Hub-Pages. Ποια teaser εμφανίζονται σε ποιον, το ελέγχουν τα Restrictions.
Τα μπλοκ αναλυτικά
Κάθε τύπος μπλοκ έχει τη δική του σελίδα με «Πότε να το χρησιμοποιήσετε», επιλογές και συμβουλές:
Τίτλος
Επικεφαλίδες & υπότιτλοι.
CmsTextΚείμενο
Μορφοποιημένο συνεχές κείμενο.
CmsImageΕικόνα
Μεμονωμένη εικόνα από τα Assets.
CmsCarouselΚαρουζέλ
Πολλά στοιχεία για ξεφύλλισμα.
CmsIframeVideoΒίντεο
Ενσωματωμένο βίντεο.
CmsIframeΕνσωμάτωση
Εξωτερικό περιεχόμενο μέσω Iframe.
CmsBlockContainer
Ομαδοποιεί & δομεί μπλοκ.
Έτσι δημιουργείτε περιεχόμενο
- Ενεργοποιήστε τη λειτουργία Edit-ModeΚάντε κλικ στο Turn on edit mode στη σελίδα.
- Επιλέξτε σημείο εισαγωγήςΠηγαίνετε στη θέση όπου θέλετε να εμφανιστεί το μπλοκ — εμφανίζεται ένα +.
- Επιλέξτε τύπο μπλοκΕπιλέξτε κείμενο, εικόνα, βίντεο, καρουζέλ …
- Εισαγάγετε περιεχόμενοΠληκτρολογήστε απευθείας ή επιλέξτε ένα asset. Οι αλλαγές είναι αμέσως ορατές.
- ΔιάταξηΜετακινήστε το μπλοκ με σύρσιμο· διαγράψτε ό,τι δεν χρειάζεται.
- Απενεργοποιήστε τη λειτουργία Edit-ModeΑπενεργοποιήστε την ξανά για έλεγχο — έτσι βλέπετε την προβολή του χρήστη.
Τι πρέπει να προσέξετε
- Δομή πριν από τη διακόσμηση: ο ρυθμός τίτλου/κειμένου/εικόνας υπερτερεί της πολύχρωμης ποικιλίας μπλοκ.
- Συνέπεια: δομήστε τους ίδιους τύπους σελίδων με τον ίδιο τρόπο — οι χρήστες προσανατολίζονται γρηγορότερα.
- Γλώσσα: επιμεληθείτε το περιεχόμενο στη γλώσσα DEFAULT· συμπληρώστε τη γλώσσα QUALITY.
- Assets κεντρικά: χρησιμοποιείτε εικόνες από τα Assets αντί να τις ανεβάζετε τοπικά — μία φορά επιμέλεια, παντού ενημερωμένες.
Αποθήκευση, προσχέδιο & έγκριση
Οι αλλαγές σας αποθηκεύονται, αλλά γίνονται ορατές σε όλους μόνο μετά την έγκριση. Έτσι εργάζεστε με ηρεμία σε ένα προσχέδιο, χωρίς οι χρήστες να βλέπουν μια μισοτελειωμένη σελίδα. Η διαδρομή από το προσχέδιο στη δημοσίευση είναι μια ξεχωριστή ροή — δείτε Έγκριση & δημοσίευση.
Μεγάλες ανακατασκευές; Ελέγχετε ενδιάμεσα με απενεργοποιημένη τη λειτουργία Edit-Mode και — σε κρίσιμες σελίδες — με έναν δοκιμαστικό λογαριασμό της ομάδας-στόχου.
Αντιμετώπιση προβλημάτων
Δεν βλέπω τον διακόπτη «Turn on edit mode».
Τότε σας λείπει το δικαίωμα επεξεργασίας για αυτή τη σελίδα. Ένας Admin σας προσθέτει στην κατάλληλη Group ή ενεργοποιεί τα δικαιώματα Content.
Η αλλαγή μου δεν είναι ορατή στους χρήστες.
Πιθανότατα δεν έχει ακόμη εγκριθεί — ή ένα Restriction αποκρύπτει το περιεχόμενο από την ομάδα-στόχο.
Ένα μπλοκ δεν μετακινείται/διαγράφεται.
Ορισμένα μπλοκ βρίσκονται μέσα σε ένα Container. Επιλέξτε πρώτα το Container, μετά το εσωτερικό μπλοκ — ή επεξεργαστείτε τη δομή στο backend.
Σχετικά
- Δημιουργία ενός Product · Οι τύποι Product
- Πολυμέσα & Assets · Έγκριση & δημοσίευση
- How to: τέλειο περιεχόμενο
Συνέχεια: Δημιουργία ενός Product.
وضع التحرير (Edit-Mode)
يحرِّر المحرِّرون المحتوى مباشرةً على الصفحة المباشرة. يحوِّل Edit-Mode كل صفحة إلى مساحة تحرير — فما تفعله تراه فوراً. تشرح هذه الصفحة كيف يعمل، ومن أي لبنات تتكوّن الصفحات، وكيف تعمل بأمان.
لماذا يوجد Edit-Mode
تفصل أنظمة التحرير التقليدية بين «التحرير» و«النتيجة» — فتملأ حقولاً في نموذج وتأمل أن تبدو الصفحة جيدة بعد ذلك. ينهي Edit-Mode هذا: أنت تعمل داخل التخطيط الحقيقي (WYSIWYG). هذا يقلّل الأخطاء، ويجعل التصميم بديهياً، ويسرّع التحرير بشكل ملموس.
ما هو Edit-Mode
Edit-Mode هو مفتاح يحوِّل صفحة عادية إلى مساحة قابلة للتحرير. عند تفعيله يمكنك إضافة كتل المحتوى وتحريرها ونقلها وحذفها — مباشرةً حيث تظهر. وعند تعطيله ترى الصفحة مجدداً كما يراها أي مستخدم عادي.
طريقان، محتوى واحد. إلى جانب Edit-Mode توجد واجهة الإدارة الخلفية (الإعدادات ← Content ← Products) بنماذج منظّمة. استخدم Edit-Mode من أجل التخطيط والمحتوى، والواجهة الخلفية من أجل البيانات الوصفية والتصنيفات والوصول والنشر. كلاهما يحرِّر Product نفسه.
التشغيل والإيقاف — ومن يراه
في الصفحات التي يُسمح لك بتحريرها يظهر المفتاح «Turn on edit mode». وما إذا كنت تراه يتوقف على صلاحياتك: فـ Edit-Mode صلاحية Admin (مثلاً بصفتك محرِّراً)، ومن خلال Groups يُحدَّد أيّ محتوى يُسمح لك بتحريره.
اللبنات: الكتل و Teaser
تُبنى صفحة Product من كتل (محتوى خاص) ومن Teaser (إحالات إلى Products أخرى).
| الكتلة | لماذا |
|---|---|
| العنوان | العناوين والعناوين الفرعية |
| النص | نص متدفّق قابل للتنسيق |
| الصورة | صورة مفردة من الأصول |
| الكاروسيل | عدة صور/عناصر للتصفّح |
| الفيديو | فيديو مضمَّن |
| Iframe / تضمين | محتوى خارجي عبر التضمين |
| كتلة / حاوية | تجمّع كتلاً أخرى وتنظّمها (أعمدة، أقسام) |
تشير Teaser (شرائح، شبكات، قوائم عناصر) إلى Products أخرى — وهكذا تنشأ الصفحات الرئيسية وHub-Pages. أما أيّ Teaser يظهر لمن فتُتحكَّم به Restrictions.
الكتل بالتفصيل
لكل نوع كتلة صفحة خاصة تشرح «متى تُستخدم» والخيارات والنصائح:
العنوان
العناوين والعناوين الفرعية.
CmsTextالنص
نص متدفّق منسَّق.
CmsImageالصورة
صورة مفردة من الأصول.
CmsCarouselالكاروسيل
عدة عناصر للتصفّح.
CmsIframeVideoالفيديو
فيديو مضمَّن.
CmsIframeالتضمين
محتوى خارجي عبر Iframe.
CmsBlockالحاوية
تجمّع الكتل وتنظّمها.
هكذا تُنشئ محتوى
- تشغيل Edit-Modeانقر على الصفحة Turn on edit mode.
- اختيار موضع الإدراجانتقل إلى الموضع الذي ينبغي أن تظهر فيه الكتلة — تظهر علامة +.
- اختيار نوع الكتلةاختر نصاً أو صورة أو فيديو أو كاروسيل …
- إدخال المحتوىاكتب مباشرةً أو اختر أصلاً. تظهر التغييرات فوراً.
- الترتيبانقل الكتلة بالسحب؛ واحذف ما لا تحتاجه.
- إيقاف Edit-Modeأوقفه للمراجعة — فترى عندئذٍ عرض المستخدم.
ما ينبغي الانتباه إليه
- البنية قبل الزينة: إيقاع العنوان/النص/الصورة يتفوّق على تنوّع الكتل الملوّن.
- الاتساق: ابنِ أنواع الصفحات المتشابهة بالطريقة نفسها — فيجد المستخدمون طريقهم أسرع.
- اللغة: اعتنِ بالمحتوى بـلغة DEFAULT؛ وأكمِل بلغة QUALITY.
- الأصول مركزية: استخدم الصور من الأصول بدل رفعها محلياً — اعتنِ بها مرة، وتبقى محدَّثة في كل مكان.
الحفظ والمسودّة والنشر
تُحفظ تغييراتك، لكنها لا تصبح مرئية للجميع إلا بعد النشر. وهكذا تعمل بهدوء على مسودّة دون أن يرى المستخدمون صفحة نصف جاهزة. والطريق من المسودّة إلى النشر عملية مستقلة — انظر الإجازة والنشر.
إعادة بناء كبيرة؟ راجع بين الحين والآخر مع إيقاف Edit-Mode، وفي الصفحات الحرجة مع حساب اختبار من الفئة المستهدفة.
حل المشكلات
لا أرى المفتاح «Turn on edit mode».
إذاً تنقصك صلاحية تحرير هذه الصفحة. يضيفك أحد المسؤولين إلى Group المناسبة أو يفعّل صلاحيات المحتوى.
تغييري غير مرئي للمستخدمين.
على الأرجح لم يُنشر بعد (النشر) — أو تُخفي Restriction المحتوى عن الفئة المستهدفة.
تعذّر نقل كتلة أو حذفها.
بعض الكتل موجودة داخل حاوية. اختر الحاوية أولاً ثم الكتلة الداخلية — أو حرِّر البنية في الواجهة الخلفية.
ذات صلة
التالي: إنشاء Product.
Edit-Mode
编辑者直接在实时页面上编辑内容。Edit-Mode 将每个页面变成一个编辑界面——您所做的操作会立即呈现。本页说明它的工作原理、页面由哪些构件组成,以及如何安全地开展工作。
为什么需要 Edit-Mode
传统的内容管理系统将"编辑"和"结果"分离——您在表单中维护字段,然后寄希望于页面之后看起来不错。Edit-Mode 终结了这种做法:您在真实的版式中工作(所见即所得,WYSIWYG)。这减少了错误,让设计更直观,并显著加快内容编辑的速度。
什么是 Edit-Mode
Edit-Mode 是一个开关,它将普通页面变成一个可编辑的界面。激活后,您可以直接在内容块出现的位置添加、编辑、移动和删除它们。停用后,您会像普通用户一样重新看到该页面。
两条途径,同一份内容。除了 Edit-Mode,还有管理后台(Einstellungen → Content → Products),提供结构化表单。请使用 Edit-Mode 处理版式和内容,使用后台处理元数据、类别、访问权限和发布。两者编辑的是同一个 Product。
开启和关闭——以及谁能看到它
在您有权编辑的页面上,会出现"Turn on edit mode"开关。您能否看到它,取决于您的权限:Edit-Mode 是一项 Admin 权限(例如作为 Editor),而通过 Groups 则限定了您可以编辑哪些内容。
构件:Blöcke 与 Teaser
一个 Product 页面由Blöcke(自有内容)和 Teaser(指向其他 Products 的引用)组成。
| Block | 用途 |
|---|---|
| 标题 | 标题与小标题 |
| 文本 | 可格式化的正文 |
| 图片 | 来自 Assets 的单张图片 |
| 轮播 | 可翻阅的多张图片/元素 |
| 视频 | 嵌入的视频 |
| Iframe / 嵌入 | 通过嵌入引入的外部内容 |
| Block / 容器 | 对其他块进行分组和结构化(分栏、章节) |
Teaser(滑块、网格、条目列表)指向其他 Products——由此形成起始页和 Hub-Pages。哪些 Teaser 向谁显示,由 Restrictions 控制。
各类 Block 详解
每种块类型都有独立的页面,包含"何时使用"、选项和技巧:
标题
标题与小标题。
CmsText文本
已格式化的正文。
CmsImage图片
来自 Assets 的单张图片。
CmsCarousel轮播
可翻阅的多个元素。
CmsIframeVideo视频
嵌入的视频。
CmsIframe嵌入
通过 Iframe 引入的外部内容。
CmsBlock容器
对块进行分组和结构化。
如何创建内容
- 开启 Edit-Mode在页面上点击 Turn on edit mode。
- 选择插入位置移动到块应出现的位置——会出现一个 +。
- 选择块类型选择文本、图片、视频、轮播……
- 输入内容直接输入或选择一个 Asset。更改会立即可见。
- 排列通过拖动移动块;删除不需要的部分。
- 关闭 Edit-Mode为了检查再次关闭——这样您就能看到用户视图。
需要注意的事项
- 结构先于装饰:标题/文本/图片的节奏胜过五花八门的块。
- 一致性:相同的页面类型采用相同的搭建方式——用户能更快找到方向。
- 语言:用 DEFAULT 语言维护内容;用 QUALITY 语言进行补充。
- 集中管理 Assets:使用 Assets 中的图片,而不是在本地上传——一次维护,处处更新。
保存、草稿与发布
您的更改会被保存,但只有在发布之后才对所有人可见。这样您可以安心地打磨草稿,而不会让用户看到一个半成品页面。从草稿到发布的过程是一个独立的流程——参见审核与发布。
大规模改造?请中途关闭 Edit-Mode 进行检查,并——对于关键页面——使用目标群体的测试账号进行验证。
疑难解答
我看不到"Turn on edit mode"开关。
那么您缺少该页面的编辑权限。请管理员将您加入合适的 Group,或开通内容权限。
我的更改对用户不可见。
很可能尚未发布——或者某个 Restriction 对目标群体隐藏了该内容。
某个块无法移动/删除。
有些块位于某个容器中。请先选择容器,再选择内部的块——或在后台编辑其结构。
相关内容
继续:创建一个 Product。